
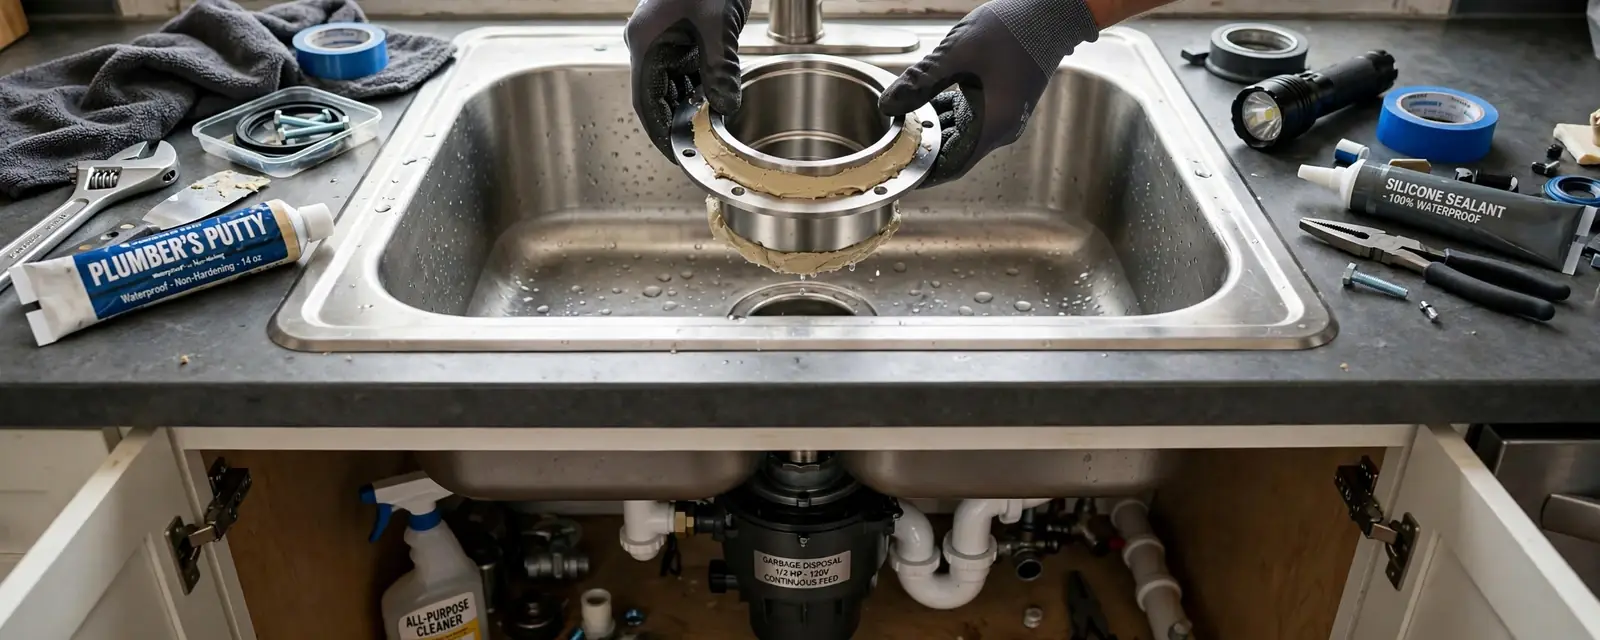
What the flange does and who should install it
Garbage disposal flange installation in Millburn, NJ homes comes down to one seal. The flange is the metal collar that drops into the sink drain opening, and everything else, the gasket, mounting ring and the disposal itself, clamps to it from below. If that seal is poor, the cabinet below the sink gets wet every time the basin drains.
A patient homeowner with basic tools can set a flange. The parts that most often go wrong are the drain alignment, the dishwasher connection, and the wiring, and those are where a licensed plumber earns the call.
The parts under the sink, named
Sink flange
The collar with a lip that sits in the sink opening. Plumber's putty or a gasket seals the lip to the sink surface.
Gasket and backup ring
A fiber or rubber gasket and a backup ring slide up the flange from below and cushion the sink bottom.
Mounting ring and snap ring
The upper mounting ring, held by a snap ring, carries the three screws that pull the whole stack tight.
Disposal body and discharge tube
The unit hangs on lugs in the mounting assembly, and a short discharge tube sends waste into the trap.
Before you buy or unscrew anything
Quick checks that save a second trip to the store
- Look under the sink and note whether a dishwasher hose already runs to the old unit
- Check the sink material and whether the existing cutout is chipped or cracked
- Measure from the sink bottom to the trap arm, since a longer motor needs more room
- Find the breaker or plug that feeds the disposal and confirm it is off
- Have a bucket, a flashlight and a rag ready for the trap, which holds standing water
A disposal is heavy once the motor is attached, so support it with a block or a helper while you lock it onto the lugs. Dropping it on a loose mounting ring is how threads strip and gaskets crush.
Putty or gasket, and why the sink matters
Most flanges seat on a rope of plumber's putty rolled to about the thickness of a pencil and pressed under the lip. Some kits ship with a rubber or foam gasket instead, and certain makers call for silicone. Follow the instructions in your own box, since the seal material is matched to the flange.
Sink material matters too. Putty contains oils that can stain porous natural stone, and a thin or cracked cutout can crush under uneven screw pressure. If your sink is stone, composite or thin stainless, read the manufacturer's notes before you start.
Disposal leaking at the flange?
Call the 24/7 line and a licensed plumber can check the seal, the trap and the dishwasher connection.
Installing the flange, step by step
Kill power and clear the cabinet
Switch off the breaker that feeds the disposal, disconnect the old unit, and take the old flange out by loosening the mounting screws and snap ring.
Clean the sink opening
Scrape off old putty and dry the surface so the new seal grips a clean ring of sink.
Seat the new flange
Press a rope of putty under the lip, drop the flange into the opening, and press down hard from above so some putty squeezes out.
Build the stack from below
Slide on the gasket, backup ring and mounting ring, then seat the snap ring in its groove on the flange.
Tighten the three screws evenly
Work around the ring a little at a time until the flange feels solid, then wipe away the squeezed-out putty.
Hang the disposal and test
Lift the unit onto the lugs, lock it with a quarter turn, connect the drain, then fill the basin and watch the joints for weeping.
Drain alignment is where most DIY jobs stall
The disposal outlet sits at a fixed height and angle, and your trap arm may not line up with it. In a double-bowl sink the discharge tube also has to meet the continuous waste tee between the bowls, which can put it a half inch off.
A crooked tube forced into place creates a slow leak that only shows up under load. A plumber can reshape the trap and tailpiece so every joint sits square, and a sluggish line behind the trap should be addressed first through drain cleaning, because a new disposal pushing waste into a restricted pipe only makes it worse.
The dishwasher knockout
Knock out the plug before you connect the hose
Most new disposals have a solid plug in the dishwasher inlet. Tap it out with a screwdriver and hammer from the inside of the inlet, and fish the loose plastic disc out of the grinding chamber. Skip this and the dishwasher will not drain, and gray water can rise in the sink.
Then clamp the dishwasher drain hose to the inlet. Many installers loop the hose high under the countertop so sink water cannot flow back, but the right arrangement depends on local rules, so confirm it with the building department.
DIY or call a plumber
| Situation | Handy homeowner | Call a licensed plumber |
|---|---|---|
| Same-brand swap, flange in good shape | Often fine | If anything leaks after setup |
| New flange in a new or stone sink | Read the sink notes first | If the cutout is cracked or oversized |
| Trap needs reshaping | Possible | If joints will not line up square |
| Hardwiring or a new switch | Not a casual task | Yes, bring in a licensed professional |
| Dishwasher hose and high loop | Possible | If local rules or an air gap are unclear |
| Slow drain beyond the trap | Not a flange issue | Yes, clear the line first |
When a unit already leaks at the top, jams, or hums without turning, garbage disposal repair often costs less than a swap, and a plumber can tell you which it is before parts are bought.
What changes the price of having it done
- Whether the old flange is stuck, corroded or leaking into the cabinet
- The sink material and whether the cutout is sound
- How much trap and tailpiece work the new alignment needs
- Dishwasher connection and the hose arrangement
- Existing wiring, switch and power supply
- Whether the disposal itself is also being replaced
Nearby towns, same questions
Kitchens in Maplewood and West Orange vary widely in layout, and so do the sink bases. A tight cabinet is the usual reason the trap will not line up, so measure the clearance from the sink bottom to the trap arm before you buy a larger, longer unit.
Millburn, NJ: check the license and ask about permits
Plumbing contractors in New Jersey are licensed through the State Board of Examiners of Master Plumbers, which sits within the Division of Consumer Affairs. Homeowners can look up any plumber with the board before hiring, so you do not have to rely on a truck door or a verbal claim.
New Jersey's plumbing subcode is based on the National Standard Plumbing Code. Permit rules vary, so ask the Millburn building department whether a disposal swap or a trap change needs a permit before you start.
The practical takeaway is to make that call first, because a straight like-for-like swap can be treated differently from moving drain pipe, and it is easier to learn that before the cabinet is opened.
Source type: NJ Division of Consumer Affairs and NJ plumbing subcode
Frequently asked questions
Use whatever your disposal maker specifies. Putty is the common seal under the lip, but some makers and some sink materials call for silicone, since putty oils can stain porous stone.
Only if the mounting system matches. Flanges, rings and gaskets are built as a set, and a different brand often uses a different mounting style. When in doubt, use the parts that come with the new unit.
The most common cause is the knockout plug that was left in the disposal's dishwasher inlet. A kinked or poorly looped hose is the next suspect.
Too little putty, a dirty sink surface, or uneven screw pressure can all leave a gap. Remove the flange, clean it, reseat it, and tighten the three screws a little at a time.
Look the plumber up with the State Board of Examiners of Master Plumbers through the Division of Consumer Affairs. For permit questions on a disposal swap, call the Millburn building department directly.
Switching the breaker off and reconnecting a plug-in cord is one thing. New wiring or a new switch is better left to a licensed professional, and permit rules vary, so ask the Millburn building department.
Still have a question? Call the 24/7 line and talk it through with a dispatcher.